Sunday, April 29, 2007

Hamburger Buns

We kicked off the grilling season last weekend with these extremely conventional hamburgers. In truth, it could have happened a lot earlier, weather-wise, but the barbecue, which had wintered on the balcony, had mysteriously acquired a layer of greeny-gray mold, and it took some girding of loins, etc, before it could be tackled. (Please tell us how to avoid this fate next year, as it will then be my turn to clean it!)

Hamburger

Anyway, the point of this isn't the grilled patties (since I'm not the designated griller in this household), or even the rest of the fillings. (Look, it was the first hamburger of the season. Nasty processed cheddar-like substance is totally required. I think there's a law somewhere.)

Hamburger Buns

The point is, I love these hamburger buns. It's slightly embarrassing, because it's basically just... white bread. Very unhealthy white bread. That goes stale in, like, twelve hours. Still. They taste right, and not like the plastic-textured ones you buy ready made.

Hamburger Buns
based on Jorden runt på 80 degar by Annica Triberg

for 6-8 buns

25 g (scant 1 oz) butter
250 ml (&1 cup) milk
25 g (scant 1 oz) fresh yeast
½ tsp salt
½ tbsp sugar
600-700 ml (2½-3 cups) all-purpose flour

1 egg
sesame seeds

Melt the butter in a pan, add the mil and heat until lukewarm. Crumble in the yeast and stir until dissolved. Add salt, sugar, and most of the flour and knead until you have a smooth dough. Cover and let rise for 30 minutes.

Punch down the dough and roll it out to a thickness of about 1cm (scant ½inch). Cut out rounds about 10 cm in diameter and transfer to a cookie sheet. Cover and let rise about half an hour.

Whip the egg lightly and brush the buns with it. Sprinkle with sesame seeds and bake at 225°C (440°F) for about 10-12 minutes. Cool on racks.

Recipe after the jump!

White Bean & Pecan Salad

I usually see beans as belonging in stews and soups, mostly because I can't for the life of me cook them to perfection. Beans turn mushy, this is a fact of life, and mushiness in salads is generally frowned upon. Imagine my joy when I noticed, in a recent issue of Ruoka & viini, a recipe for a bean salad where you overcooked the beans on purpose. (This was part of a Georgian - the country, not the state - menu with several other dishes I've been meaning to try out - there's a cheese pie that sounds divine.)

Bean & Pecan Salad

Then, of course, I forgot about it for over a month until one day while grocery shopping I thought I remembered the details well enough to wing it. I didn't, as it happened, and wound up having to improvise a bit. It's not a very pretty dish - the pecans are ground together with spices and herbs, the browned onions are kind of the same color as the mushy beans - but there's a nice piquant edge to the thing, where the sharpness of the vinegar is cut by earthy, cinnamon-dominated spiciness.

White Bean & Pecan Salad
serves 4 as a light lunch/starter; adapted from Glorian ruoka & viini 2/2007

150 g dry white beans (cannellini or navy)
2 large onions, chopped
4 cloves garlic, minced
2 tbsp olive oil
3 tbsp white wine vinegar
150 ml pecans, lightly toasted
a bunch of fresh basil
a bunch of fresh parsley
½ tsp each ground coriander and cinnamon
¼ tsp each ground cloves and nutmeg
1 tsp Maldon salt
(fresh greens)

(the original used walnuts instead of pecans and dill and cilantro instead of parsley, among other things)

Soak the beans in plenty of water overnight. Drain and cover with fresh water in a largeish pan. Cook for about an hour, until just slightly overcooked. Drain and set aside.

Fry the onions in the oil until nicely browned. Reduce the heat, add the minced garlic and stir until the garlic's cooked through. Add the beans and cook for a few minutes, stirring occasionally.

In a blender, grind the pecans, basil, parsley and spices. Mix with the vinegar, add salt and blend with the beans. Let stand at room temperature for about half an hour.

Toss with a few handfuls of greens just before serving.

Recipe after the jump!

Wednesday, April 25, 2007

Vuohenjuustotryffelit (Goat Cheese Truffles)

This post is an answer to the Finnish food blog challenge for April. Recipe & writeup in English after the Finnish versions.

Goat Cheese Truffles

Ihanko oikeesti piti vuohenjuustostakin värkätä makea haastevastaus? Ilmeisesti. Tämä resepti osui alkukuusta silmään kun mietiskelin haasteideoita. Pistin sen varoksi muistiin "jollei muuta keksi" - ja kuinka ollakaan, huhtikuu on ihan loppumetreillä eikä vuohenjuustosta sen pahemmin ole täällä kokkailtu.

Goat Cheese Truffles

Koska halusin osan tryffeleistä sisuksiltaan valkoisiksi muokkailin tuota alkuperäistä aikalailla. Myöskään "tuoretta" vuohenjuustoa ei kuun aikana osunut kohdalle, joten päädyin käyttämään jonkin verran mascarponea äksyn vuohen taltuttamiseksi. Puolet tryffeleistä on suklaassa käytettyä juusto-voi-sokeri-sössöä, ja loppuun juustosekoitukseen sekoitin suklaan jo valmiiksi. Ne pyöriteltiin sitten pistaasirouheessa, lähinnä ulkonäkösyistä.

Ja se maku sitten? Hieman yllättäen ihan tajuttoman hyvä. Vuohenjuusto terästyttää kummasti tryffeleiden makua jännällä, vähän kahvimaisella(?) tavalla.

Goat Cheese Truffles

In English: the theme for April's food challenge was goat cheese. No, not goat cheese in sweet dishes, just goat cheese. I noticed this recipe when surfing for ideas earlier this month, and saved it "just in case" - right. Since I wanted to keep the filling of half the truffles white, I had to do quite a lot of changes: half the truffles are just balls of cheese-butter-sugar mixture dipped in melted chocolate - for the rest, the chocolate is mixed in with the cheese etc, then formed into balls and rolled in chopped pistachios.

Goat Cheese Truffles

I have to admit I chose to make them solely for the truffles with WHAT?? aspect, but they're really surprisingly yummy. Like mini chocolate cheesecakes with a nice tang of something I bet people wouldn't be able to put a name to if they didn't already know.

Vuohenjuustotryffelit
innoitus: Gourmet lokakuu/1993

75 g pehmeää vuohenjuustoa
75 g mascarponea
50 g voita (huoneenlämpöistä)
2 rkl tomusokeria
¼ tl vaniljauutetta
75 + 100 g tummaa suklaata
(pistaasipähkinöitä koristeluun)

Notkista juustot keskenään (jos tykkää vuohenjuustosta ja vahvoista makuyhdistelmistä vuohenjuuston osuutta voisi mielestäni vielä lisätä) ja sekoita joukkoon sokeri ja vanilja. Vaahdota voi ja sekoita muihin aineisiin.

Rouhi 75 g suklaata ja sulata joko mikrossa tai vesihauteessa. Ota juustoseoksesta noin kolmannes ja sekoita suklaaseen. Anna sekä suklaa- että maustamattoman juustoseoksen jähmettyä jääkaapissa noin tunti. Tee kummastakin seoksesta noin kymmenen pikkupalloa. (Melkoisen sottaista puuhaa, toim. huom.) Kierittele suklaapallot heti pistaasirouheessa (tai muussa vastaavassa).

Valkoisten tryffelien kohdalla minulla ainakin oli sen verran ongelmia löysyyden kanssa että käväytin niitä pakkasessakin sillä aikaa kuin sulatin loput suklaasta kuorrutusta varten. Rouhi loput suklaasta ja sulata kuten aikaisemmin. Anna jäähtyä viitisen minuuttia. Dippaa juustopallot suklaaseen ja asettele voipaperille (jääkaappiin) jähmettymään.

Säilytetään jääkaapissa.

Goat Cheese Truffles
based on a recipe from Gourmet, Oct. 1993

75 g soft goat cheese
75 g mascarpone
50 g butter (softened)
2 tbsp icing sugar
¼ tsp vanilla
75 + 100 g dark chocolate
(pistachios for decoration

Blend together the cheeses; add sugar and vanilla and blend until smooth. Cream the butter and add to the cheese mixture.

Chop or grate 75 g of the chocolate and melt either in a water bath or the microwave. Take about a third of the cheese mixture and fold into the chocolate. Let both the chocolate and plain batter rest in the fridge for about an hour, then form each into about ten small balls (this will be somewhat messy). Roll the chocolate truffles in chopped pistachio - or your topping of choice and set aside (in the fridge, where the truffles should be stored).

I had to put the plain cheese balls in the freezer to firm them up enough to coat with chocolate, ymmv. Melt the rest of the chocolate as before and let cool for a bit, then dip each ball in the chocolate to coat completely and transfer to a plate (again, in the fridge) to dry.

Recipe after the jump!

Monday, April 23, 2007

Ginger Mead

inkiväärisima / ingefärsmjöd

Note: apologies for the lack of decent pictures! Today was a rainy, dismal day, besides which, I don't really have a finished product yet. I'll update with more pictures later in the week.

It's that time of the month again - Leftover Tuesday! This time, I'm using some extremely potent ginger syrup, a by-product from making crystallized ginger, to make a slightly different version of a very topical Finnish treat: mead, which is typically served with May Day fritters or doughnuts on, yes, May Day (and Walpurgis Night, the day before).

ginger mead

Now, making Finnish mead isn't quite as involved as brewing in general, nor does it produce a beverage with any more than a negligible alcohol content. You don't need any special equipment - I've even made it in regular plastic bottles - or ingredients, since it's made with regular fresh yeast. What you do need, however, is a bit of time and patience, and since I only bottled this last night, I can't even tell you what it tastes like yet. I'll be making a post on regular sima later in the week in honor of the upcoming Walpurgis, but if you want to get some ready by the 30th, here is a very typical recipe.

Of course, for the impatient among us, there's always ginger ale - a splosh of ginger syrup, another of soda water, and some ice.

ginger ale

Look for a roundup of all the fabulous leftover ideas over at Ceres & Bacchus later in the week.

Ginger Mead

350 ml strong ginger syrup (leftovers from making crystallized ginger last week)
125 g dark brown sugar
250 g caster sugar
4.5 l water
1/5 tsp fresh yeast
(raisins)

Dissolve the sugars in about half of the water. Mix with the syrup and the rest of the water in a large pan/jar/bucket and leave to cool a bit. Once the mixture is lukewarm, sprinkle on the yeast (yes, that is one fifth of a tsp) and stir to dissolve. Cover loosely and let stand at room temperature overnight.

Once the mixture has started to ferment the following day, strain through a sieve into bottles. Sprinkle a tiny bit of sugar and some raisins into each bottle, then close tightly. The mead is ready when the raisins puff up and rise to the surface, about three days at room temperature or 5-7 days in the fridge.

Be careful when opening the bottles - it can be very fizzy!

Recipe after the jump!

Crystallized Ginger

Crystallized Ginger

This may sound a tiny bit twee (making your own candied ginger?), but as a mitigating circumstance I should say that this isn't a condiment to be readily found in the shops here - I'm sure you could get it, but I've never come across any. Which is kind of a pity, because I have a weird obsession with it: I could eat it like candy! At first, there is the pronounced sweetness of the sugar it's rolled in, then the slight tang of ooh, fruity, and then finally the wonderful burn. Oh, how I love it.

Crystallized Ginger

Sadly, I'm the only one who does, it seems. Someone should really hide that jar from me, because I can't walk past it without grabbing a slice or two of ginger and gobbling it up. I had plans for this batch! Plans which included doing stuff with it. Other than coating it in chocolate and eating it all up (instead I settled for mixing it with some mocha beans I got for my birthday - one of each, open mouth, savor).

Crystallized Ginger

I'm not going to post the recipe here, since it's available on the internet and I followed it to the letter (how could I not - there was 7-up! steaming! 6 hours of cooking!). Just keep in mind when starting out that although there's not much actual work involved, it does take the better part of a day to finish, so make a big batch. Supposedly it will keep forever, but I doubt I'll ever find out.

Crystallized Ginger

Oh, and don't throw away the syrup! Make mead with it instead.

Recipe after the jump!

Saturday, April 21, 2007

Ansjovis- och lökpasta (Sprat & Onion Pasta)

As before, there's a writeup and recipe in English if you scroll down.

Tidigare i veckan skrev jag ett inlägg om nåt som jag kanske mot lite bättre vetande ville kalla "frestelse" - främst för att det är roligare att tala om "temptation" än om "casserole" som låter direkt mos(s)igt. Nå, oberoende fick jag till min stora förvåning reda på att det vi på svenska (och finska, måste man väl därmed anta) kallar ansjovis inte alls är anchovies på engelska, utan sprats. (Anchovies är sardeller.)

Sprat & Onion Pasta


Nu har jag en längre tid kockat främst från engelska recept, ganska ofta från sådana som innehåller "anchovies" ty det blir gott och pikant tycker jag. Fast jag alltså gjort helt fel hela tiden. Efter att ha återhämtat mig från chocken insåg jag såklart att detta i praktiken utökar min lista på favoritrecept avsevärt, eftersom man ju såklart måste testa allting också på det avsedda viset.

Sen hade min närbutik inga sardeller alls, så då fick jag nöja mig med det gamla vanliga ändå. Lite snopet, såklart, men å andra sidan kan jag då lägga in det här receptet i Jespers ansjovistävling. Så värst originellt eller nyskapande är det ju inte, men tycker man om karamelliserad lök (vilket jag gör) så blir det här en mumsig och enkel (om än inte så snabb) pastarätt.

I övrigt är det på riktigt bästa ansjovisreceptet gubbröra, men det har jag aldrig gjort själv, bara glufsat i mig mammas och mormors.

Sprat & Onion Pasta


In English: having detailed my problems with the "my anchovies aren't anchovies but sprats" conundrum earlier this week, here is a recipe that would probably work just as well with either fish. Not fast, and not very elegant (a broader pasta would do the trick but I didn't have any), but if you like caramelized onions (and I do), this makes for a very pleasant lunch.

Ansjovis- och lökpasta
för två-tre personer

3 stora lökar
en slurk olivolja
8 små ansjovisfileer (hälften av en 80g burk)
5 soltorkade tomater
(en slurk vin eller sherry)
lite persilja
peppar
pasta (själv har jag en konstig med fullkornsspagetti, men man tager såklart vad man haver lust för)

Skiva löken fint och fräs den mjuk i en ordentlig slurk olja (använder jag oljedränkta tomater så tar jag av den) på relativt hög värme. När löken börjar ta färg sänks värmen och stekningen fortsätts (under omrörning) tills den är helt igenom gyllenbrun.

Tärna den soltorkade tomaten och ansjovisen fint och blanda dem med löken, eventuellt också med en slurk vin eller sherry. Koka i några minuter, smaka av med peppar och blanda i persiljan.

Blanda med den färdigkokta pastan i kastrullen och servera genast, med parmesan om du inte är Fiskpasta Utan Ost!!!-purist.

Sprat & Onion Pasta
serves 2-3
3 large onions
a tbsp or two of olive oil
8 small sprat filets (or anchovies, about 40 g drained fish)
5 sun-dried tomatoes
(a few tbsp of wine or sherry)
a few tbsp of fresh parsley
pepper to taste
pasta

Slice the onion thinly and soften on moderate heat in the oil (if I'm using oil-stored tomatoes, I use oil from the jar). Once it starts getting a bit of color, lower the heat, cover, and keep frying, stirring every now and then, until the onion is a deep golden brown color.

Chop the sprats and tomatoes finely and add to the onions, possibly with a splosh of wine or sherry. Keep frying for a few minutes, then toss in the parsley and season with freshly groud black pepper. Mix with the pasta and serve immediately, with parmesan if you don't disapprove of the cheese-and-fish combo.

Recipe after the jump!

Friday, April 20, 2007

Fish & Quips: Cottage Pie


I love English desserts. When I think of English food, it's not blandness that springs to mind (of course, Finnish cuisine is the only one inferior to the English, so my opinion shouldn't count for very much), but an abundance of hearty, unfussy sweets, laden with fruits and especially berries - take a look at summer pudding as a prime example. Not to mention trifles, and fools, and crumbles. (I've even tried to make my own clotted cream, with, erm, interesting results.) Oh, and custards. Homemade custard is so good... In fact, I think I've solved my what about Sunday's dessert problem, or rather, replaced it with its opposite: how to choose from all of those...

Cottage Pie

With all this love for English desserts, it may be a bit of a surprise that the dish I'm presenting for the English food isn't a joke-event, hosted by Sam of Becks & Posh, is a savory one, and it's not even an English breakfast (mmm, fried tomatoes and rashers and eggs and baked beans). And there's nothing funny about cottage pie other than the name - that the lamb version is a shepherd's pie is quite understandable, if you overlook the fact that it is in fact not the least pie-like, but rather a casserole. A layer-deficient casserole. But what's so cottage-y about beef mince?

Cottage Pie

Anyway, we all know how I like my casseroles, and the weather is obliging me by being very English (pouring rain and 10°C), so we're going to tuck into this hearty and comforting dish RIGHT NOW.

Cottage Pie

I don't really have a recipe for you: I made a mince sauce out of finely chopped onions, celery and carrots, half a package of bacon and about 800 g of minced beef, a can of crushed tomatoes and a squeeze of tomato puree, a bay leaf, some beef stock, and salt and pepper. (I let the sauce simmer gently for about half an hour, while preparing the mash topping and heating the oven.)

Then made a mash out of four medium-large potatoes and two parsnips by boiling them, peeled and cut into chunks, in salted water and mashing them together with an, ahem, generous amount of butter and some finely grated cheddar (not exactly kosher, but good), seasoning with freshly ground pepper and nutmeg.

Transferred the meat sauce to a large ovenproof casserole (plus some portion-sized ones) and topped with the mashed root veg, dotted the whole thing with butter, and baked at 175°C until it got a nice color, about 45 minutes.

And, erm. If you fill your baking dishes very full, make sure to have a piece of foil or something at the bottom of your oven catching drips.

Just saying.

Recipe after the jump!

Thursday, April 19, 2007

Hay, Hay, It's... Earl Grey Mousse with Pear Slices and Raspberries

As far as I can recall, I haven't made mousse since home ec class. No, wait, I lie! There was this FABULOUS Mint Chocolate Mousse in Nyt (that would be the weekly supplement to Helsingin Sanomat, not the Times) maybe ten years ago, and I made it once and loved it... and lost the recipe (fellow Finns, I would be eternally grateful for that recipe). No, wait, I lie some more! Last year for Independence Day I made a three-mousse dessert (Lemon, Dark Chocolate and Mascarpone & After Eight) that was just... wow. Especially the After Eight.

Earl Grey Mousse with Dried Pear Slices

Maybe I've made mousse once a month my whole life and just keep forgetting about it? This mousse will be remembered, at least, because I made it for Helen's edition of Donna Day, the 11th all-in-all. And because it was interesting - in a good way! It's definitely a grown-up dessert, even though no booze is involved: the combination of Earl Grey tea and dark chocolate gives it quite an edge, which is beautifully cut by the oven-dried pears it's served with.

Earl Grey Mousse with Dried Pear Slices


Indeed, when, erm, licking the bowl, I had some pangs of doubt - the taste of tea felt a bit harsh and overpowering. I don't know whether it was the time in the fridge, settling, or just pairing it with the sweetened, crisp pears and juicy raspberries that brought everything together beautifully by the time it went on the table.

Earl Grey Mousse with Dried Pear Slices and Raspberries
adapted from Glorian Ruoka & Viini, serves 5-6

for the pears:
2 pears
icing sugar

for the mousse:
100 g dark chocolate (I used Lindt 70%)
150 ml + 150 ml + 2 tbsp thick cream
1 tbsp Earl Grey leaves (my tea is VERY strong, so you may want to up this if yours doesn't fill the entire kitchen with bergamot fumes when you open the tin)
150 ml sugar
2 tbsp water
4 egg yolks
2 sheets gelatin

to serve:
raspberries

Wash and dry the pears and slice them thinly. Place the slices on a papered cookie sheet and sprinkle with icing sugar. Dry in a 125°C oven for about an hour or until they're crisp to the touch. Let cool, then carefully peel off the parchment paper.

Dried Pears

Chop the chocolate very finely and place in a bowl. Bring 150 ml of cream and 1 tbsp tea to the boil. Take off the heat and let steep for a few minutes, then strain and discard the tea leaves, bring the cream back to the boil, and pour over the chocolate, stirring gently until the chocolate melts.

In another pan, bring sugar and water to a boil. Slowly add the egg yolks to the hot sugar syrup while beating with a handheld electric mixer. Keep beating for a minute or so, then transfer to the bowl of your KitchenAid standing mixer of choice and beat until very light and airy.

In yet another bowl (I know!), beat 150 ml cream to soft-ish peaks. Fold the chocolate mix and the cream into the beaten egg mixture.

Soak the gelatin leaves in cold water for five minutes, then squeeze off excess water and dissolve into the remaining 2 tbsp of cream. (Um, which you've heated. Or it won't dissolve.)

Fold the gelatin cream into the mousse and let rest in the fridge for about an hour (alternatively, spoon into whatever dishes you want to serve it from and save yourself the bother of trying to do the next step). Spoon lumps of mousse onto pear slices; try to make this look attractive.

Serve with raspberries.

Recipe after the jump!

Tuesday, April 17, 2007

Sweet Potato and Bacon Temptation

OK, so strictly speaking, it's probably not traditional enough to be a temptation: the ur-temptation, Jansson's frestelse (Janssonin kiusaus) consists of layers of julienned potatoes and anchovies (which that wiki article just told me I should be calling sprats - I had no idea!) drenched in cream, and I'd have no qualms about calling a potato-and-ham casserole a temptation, but this? It doesn't even look very tempting (I hate it when that happens), even though I made a few portions in those snazzy little cups, which is so not How It's Done.

Sweet Potato and Bacon Temptation


Yes, whatever. It's another mushy casserole. I love them. This one involved bacon and cheese, so of course it was yummy. Enough said.

Sweet Potato and Bacon Temptation
based on two different temptations from an old issue of Ruoka & Viini

about a kg (2 medium/large) sweet potatoes
1 medium potato
170 g bacon
3 large onions
3 cloves garlic
a big bunch of basil
350 ml cream (or milk, or a mixture of both)
100 g feta, crumbled
salt & pepper
butter

Julienne the potatoes. Cut the bacon in bite-size pieces and fry until slightly crisp; drain on kitchen paper to get rid of excess fat.

Chop the onions and mince the garlic and mix together in a bowl. Mix with the (coarsely chopped) basil.

Arrange layers of potatoes, onions, feta and bacon in a pan (or several), salting and peppering between layers. Pour over the cream, dot with a bit of butter, and bake at 200°C for about an hour, until the surface of the dish is slightly crispy and the inner parts very very soft.

Recipe after the jump!

Sunday, April 15, 2007

Sans Rival

Sans Rival

Much like Haalo, when it comes to birthday cakes I am the designated baker even when the birthday is my own. This year, one of my presents was a cream-colored KitchenAid (and believe me, you were *this* close to getting a postful of KitchenAid porn instead of this recipe - it is perhaps the prettiest thing in this apartment, save one of my three cats), so naturally I wanted to make something with lots and lots of whipped things. Such as egg whites and, oh yeah, buttercream. How convenient, then, that I'd already earmarked a recipe that consists almost (actually, there's no "almost" about it) exclusively of meringue and buttercream.

Sans Rival

This cake is also known as Ellen Svinhufvud Cake in Finland, after the wife of one of our presidents who liked to have this served at receptions and the like. In other countries I think it's known as Fragilité, but I'm not sure if the recipes are exactly the same. Either way, it's decadent without being cloying, which is always a plus.

Sans Rival

It consists of layers of crackling macaroon sheets and is filled and covered with mocha-flavored buttercream and sprinkled with toasted flaked almonds. It's not nearly as difficult to make as I'd thought, and like a lot of things it improves if you have the patience to let it sit in the fridge for a day or two.

Sans Rival

And yes, it's exactly as healthy as it sounds.

Sans Rival
the recipe for this was all over the newspapers this winter because of some sort of legal battle. I snagged the proportions from Hufvudstadsbladet and the method from, I think, Helsingin Sanomat

Macaroon layers
150 ml icing sugar
200 ml egg white (~6 eggs)
150 g (very finely) ground almonds

Filling
150 ml strong coffee
5 tbsp sugar
150 ml cream
300 g butter
100 g (very finely) ground almonds

Garnish
25 g flaked almonds, lightly toasted
icing sugar

Cover two cookie sheets with cooking parchment.

Whip the egg whites and sugar for about 15 minutes, until it turns sticky. Carefully fold in the ground almonds.

Divide the meringue in four parts, two on each sheet, and spread into 25*16 cm rectangles. Bake both sheets simultaneously at 125°C for about an hour (switching the positions a few times during baking), until they are completely dry.

C-a-r-e-f-u-l-l-y loosen the macaroon sheets from the parchment with the help of a spatula and equally carefully transfer them to wire racks to cool.

Blend the sugar into the still-hot coffee, stir to dissolve. Add the cream and let the mixture cool. Whip the butter until light and fluffy. Adding just a little at a time, drizzle in the coffee-cream mixture while beating continuously. Finish by beating in the ground almond.

Spread the mocha cream on the cooled macaroon layers and assemble the cake. Sprinkle with the toasted almond flakes and finish with a dusting of icing sugar. (As you may notice from the pictures, I kind of forgot the icing sugar part. Maybe I'm getting old.) Transfer to fridge until you're ready to serve (can be made 2 days ahead).

Notes: yes, you are meant to ruin the smooth buttercream with ground almonds. I did, although it PAINED ME to see my lovely shiny frosting turn all gritty. It tasted good though. (Maybe almond extract would do the same?) If you buy ready-ground almonds, be sure to grind them some more in a blender, both for the frosting and macaroons.

Recipe after the jump!

Friday, April 13, 2007

Crispbread-crusted Perch Fillets

hapankorppuleivitetyt ahvenfileet / surskorpsbröade abborrfileer

There was a time when "fish" to me meant something oven-baked. Seasoned, foil-wrapped baked fish is all very well and good, and above all healthy, but it's not, you know, very fun. Because fun = butter, I suppose.

Breaded Perch Fillets

I had some breaded teeny-tiny perch fillets at a restaurant in Tampere last month, and there was no mistaking the fact that they were made with lots of fun, er, butter. It seemed simple enough, and indeed my own attempts almost surpassed the restaurant's at the first try although, or possibly because, I couldn't find perch fillets as tiny as theirs. The breadcrumbs are made of sourdough thin crisps (hapankorppu/surskorpa), which may of course be a bit hard to find since they're a Finnish speciality, but I should think any sour rye bread would yield a similar result.

Breaded Perch Fillets

We had ours with Elise's Sesame Spinach and some chive-studded mashed potatoes. (I totally fail as a photographer for not noticing how utterly unbeguiling the lump of mash in the background was. Agh! Alas, there were no leftovers to rectify things with.) At the last minute I realized it could probably do with some kind of sauce, so I threw together various liquid-or-meltable dairy things and some garlic and chives.

Crispbread-crusted Perch Fillets
serves 3
9 perch fillets à about 30 g each
salt & white pepper
1 egg
1 tbsp milk
60 g thin crisps, crushed
2 tsp dried dill (or a bit more fresh, finely chopped)
butter for frying

Very Improvised Sauce
100 ml or so cream
3 tbsp crème fraîche
3 tbsp soft goat cheese
2 cloves garlic, minced
some chopped chives
salt & pepper

Mix all the ingredients (except chives) for the sauce and bring to the boil. Simmer gently while you prepare the fish, then add the chives and taste off with salt and pepper just before serving.

Season the fish fillets lightly with salt and pepper.

Mix together egg and milk in a bowl and breadcrumbs and dill on a plate. Dredge the fish first in the egg and then in the breadcrumbs, making sure to coat both sides and dusting off excess crumbs.

Fry the fish in a medium-hot pan in a bit of butter - a very short time on each side is enough for fillets this size. (I'm hedging here because I didn't exactly time it. 45 seconds? 30? They were extremely thin!)

Serve immediately.

Recipe after the jump!

Wednesday, April 11, 2007

Cold Roast Beef

Paahtopaisti / rostbiff

I don't really know that I'm using the right name here. What I mean when I say "roast beef" is indeed a big hunk o'cow, but the preparation method is fairly specific: the surface of the roast is rubbed with pepper and garlic, it's browned in a hot pan with a bit of butter, then roasted at a low temperature until medium-rare, then marinaded overnight in a garlicky, herb-infused brine-type... thing.

Roast Beef

Um. Then it's sliced thinly (thinner than in my pictures - equipment at the cottage does not include sharp knives) and served cold. Or you could get it from the cold cut section in well-stocked groceries, but that's nothing to blog about.

Cold (Garlic) Roast Beef
originally from Stockmann's customer magazine
big hunk of beef roast - size doesn't really matter here, but this makes for excellent leftovers
a tbsp or two of butter
ground black pepper & salt
1 clove garlic, cut in half

1 l (4 cups) beef stock (I use commercial)
100 ml (scant half-cup) balsamic vinegar
1 large-ish onion, sliced
1 small leek, white & light green parts only, sliced
fresh oregano & thyme - quite a lot
5 cloves garlic

Bring the meat to room temperature, then rub it all over with the cut sides of the garlic. Rub in a generous amount of pepper and a dash of salt. Brown all sides of the roast in a bit of butter. Roast at 125°C/260°F until the internal temperature reaches 59°C/138°F.

While the roast is, er, roasting, throw all the ingredients for the marinade in a pot and bring to the boil. When the meat comes out of the oven, place marinade and roast in a sealed ziploc or roasting bag (that is then placed in a bowl). Refrigerate overnight, brush off stray pieces of herbs and onions, and bring to room temperature before serving.

Roast Beef

If you have leftovers, they keep well wrapped in foil (only slice as much as you'll eat at once, though, as the thin slices will go dry and ucky). Makes for excellent sandwiches!

Recipe after the jump!

Tuesday, April 10, 2007

Goat Cheese, Asparagus & Mushroom Tart

On Why Easter Is Evil: I have eaten my weight in chocolate, and eggs, and chocolate eggs. In fact, I'm fairly sure I have chocolate trickling out of my ears, which is why I can't think of a thing to say about this pie. Tart. Whatever.

Goat Cheese, Asparagus & Mushroom Tart

The recipe comes from Epicurious, I only decreased the cream a bit and added some asparagus. And used my own crust recipe. It was very pretty straight out of the oven, which I took as a sign that I could wait with the pictures until just before brunch. This was a mistake, as it turned a bit... wrinkly in the meantime. (I was really just holding out hope-against-all-hope that the gale-like winds would ease up so I could go outside and take pictures without my fingers freezing off. In vain, as it turned out, but luckily some superglue rendered me ten-fingered anew.)

Goat Cheese, Asparagus & Mushroom Tart
adapted from Bon Appétit Nov/97

Goat Cheese, Asparagus & Mushroom Tart


100 g (3½ oz) of cold, lightly salted butter, cut into small cubes and then chilled
250 ml (generous 1 cup) all-purpose flour
3 tbsp ice-cold water

200 ml (6¾ fl oz) whipping cream
4 cloves garlic
½ tbsp dijon mustard
1 egg
200 g (7 oz) fresh asparagus
400 g (14 oz) shiitake mushrooms
salt & pepper
100 g (3½ oz) soft goat cheese

Put the flour in a bowl and top with the butter. With the tips of your fingers, work the butter into the flour until it's almost cohesive. Add the water and stir gently with a fork until the dough starts coming together (adding more water if needed). Dump the dough on a piece of clingfilm and bring it together with your hands to form a ball, then press down to a disc. Cover with the clingfilm and refrigerate overnight.

On a piece of lightly floured parchment paper, roll out the dough. Transfer to a 27-cm (10-inch) pie pan and chill while your oven heats to 175°C/350°F, then cover with tin foil and weigh down with beans. Bake for about 30 minutes, remove the tin foil and bake until the shell is pale golden.

Meanwhile, boil the cream and garlic until reduced to about ¾s; put through a blender to puree. Fry the shiitake in a dry pan until soft and the asparagus in some butter until al dente. Once the garlicky cream has cooled a bit, mix in the egg and dijon.

Once the shell is cooked and has cooled a bit, spread the goat cheese on the bottom. Sprinkle the shiitake on top of the cheese and arrange the asparagus on top of the shrooms. Spoon over the cream and bake until set, about 25 minutes.

Recipe after the jump!

Thursday, April 5, 2007

Sweet Easter: Paskha, Kulich, Mämmi & Mignon

Pasha, kulitsa & mämmi / pasha, kulitsa & memma

Easter is one of the seasons when you really feel the Russian influence on Finnish food traditions: mämmi, a truly strange-looking (and tasting, it has to be said) malted rye pudding, is our own, but paskha and kulich are both of Russian Orthodox origin.

pasha & kulitsa

My aunt supposedly tried to make mämmi herself once (read more about making it at Axis of Ævil) and never repeated the experience, and quite frankly, I'm not that wild about it (nor do I have enough people to serve it to to make it worthwhile), but paskha, a creamy, eggy, buttery, Lent-busting quark concoction is easy to make as well as yummy, and so it gets made every year. I've used a fine sieve to drain it in previous years, but this year I am in charge of THE paskha and got to use my aunt's wooden mould, decorated with Orthodox crosses.

Almost every recipe available would have you contaminate this fabulously tangy-creamy dish with either raisins, candied lemon peel, crushed almonds or a combination of the above. I'm going to flout public opinion here and state that they are wrong. And not just because I hate raisins.

kulitsa & pasha

We usually have our paskha spread on top of slices of plaited sweet pulla bread, but this year I was inspired to try out the saffron-scented round kulich instead. I'm borrowing the form from Marianna* but deviating a bit from her great-grandmother's recipe in favor of a firmer, more conventional dough, mostly because I didn't have the time to do otherwise.

Mignon Egg

To cap this post off (I'm heading out to our cottage in just a few minutes and won't be back until Monday, so happy Easter!), here is a Mignon - the quintessential Finnish chocolate egg. It looks just like a regular egg, you may think, and that's because it is - Fazer has sold these nougat chocolate-filled egg shells since 1896.

Hyvää pääsiäistä / glad påsk!


Mignon Egg


*whose Nordic Recipe Archive I really can't recommend enough - her recipes aren't necessarily exactly like the ones I use, but they always seem right. Besides, she agrees with me on the evil of crunchy bits in paskha. So there.

Paskha
600 g quark (look for tvorog in East-European specialty shops or make your own)
150 g sugar (I used about 50 g from my vanilla bean repository and the rest normal caster sugar)
200 g butter, softened
3 egg yolks
200 ml thick cream

Drain the quark in cheesecloth or a coffee filter overnight. If you're using a wooden mould, soak it overnight.

Whip the butter and sugar until light and creamy. Add the egg yolks, one at a time, still beating. Mix in the quark and, you guessed it, beat some more. You want everything to be smooth and airy.

In a separate bowl, whip the cream until it's thick and heavy. Fold it into the buttery quark mixture (no more beating!).

Line your mould (or strainer, sieve) with a single layer of dampened cheesecloth and spoon in the paskha batter. Fold the edges of the cheesecloth over the paskha, top with a plate or two for weight, and place in a bowl (to catch the drippings). Refrigerate for about 24 hours, then unmould and serve spread over slices of kulich or other sweet bread.

Kulich

25 g yeast
200 ml milk
pinch of saffron
1 egg
100 ml sugar
about 425 g all-purpose flour
100 g ground almonds
125 g softened butter
almonds for decoration
1 egg for eggwash

Heat the milk until it's lukewarm and dissolve the yeast and saffron in it. Mix in eggs and sugar, then ground almonds and finally about 375 g of the flour. Stir with a fork until everything is evenly mixed, then add the softened butter. Work in the rest of the flour, kneading until you have a soft, springy dough.

Let rise in a covered bowl for about half an hour, then shape into a flat disc about the size of your cake mould. Line the sides of said mould with buttered parchment paper that comes a fair bit over the edges of the mould (but not so high it won't fit in the oven *cough*), transfer dough to it. Cover with a towel and let rise for another half-hour.

Decorate with whole almonds, brush with the lightly whipped egg (er, I totally forgot), and bake at 200°C for about 30-35 minutes. Cool on a rack, then keep wrapped in foil, cutting slices to serve with paskha.

Recipe after the jump!

Monday, April 2, 2007

Rostad höna med chorizo & kronärtsskocka (Chorizo and Artichoke-Stuffed Roast Chicken)

I'm at the speaking in tongues thing again, this time for the Swedish food blog event Cyberkocken (check out the roundup here). Writeup and recipe in English below.

Roast Chicken with Chorizo & Artichoke stuffing

Så var det då dags att försöka blogga om mat på det andra inhemska (som visserligen är det första för mig, men ändå - jag har blivit van vid att både skriva om och tänka på mat mest på engelska, bisarrt nog).

Ingredienserna till Cyberkocken var ju då citron, chorizo, kronärtsskocka och bröd. (Se alla bidrag här.) Färsk kronärtsskocka hittade inte jag (har faktiskt ingen aning om när det är säsong) så tanken på en gräddig, chorizospäckad gratäng fick jag begrava redan i startgroparna. Samtidigt var det ett tag sen jag rostade höna, faktiskt var det före jag började matblogga här, så då kom det ju sig naturligt att (istället för att hitta på ett riktigt recept) bara blanda ihop alltihop i en fyllning till en (eller i det här fallet två; brodern min var tillväntad till söndagslunch och honom får man reservera gott om kött åt) höna och sedan bara slänga hela härvan i ugnen. Eller?

Chorizo, Bread & Artichoke stuffing

I praktiken satt jag sen där med en hel massa fyllning (jag brukar kalla det stuffing vid julbordet och få förebrående blickar från den äldre mer språkvårdande generationen) som inte rymdes i hönan, men kom på att i *host* salmonellahysteriska trakter så tillreds stuffingen (hjälp! kan inte tänka på det med rätta namnet!) ofta separat. Så då blev det diverse små formar i ugnen också.

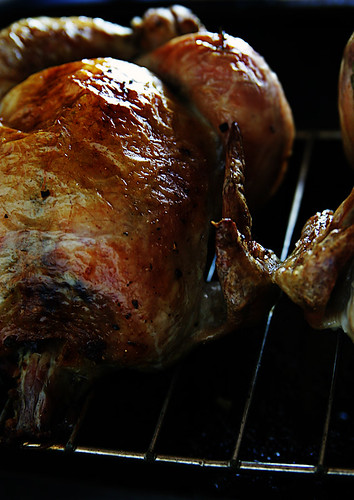
Att rosta kyckling/höna i ugnen är lätt som en plätt, det var det ingen som berättade åt mig före jag själv, med stor bävan, försökte mig på en av Nigellas allra simplaste versioner. Fortfarande räknar jag ut stektiderna enligt tabellen i How to Eat: 30 minuter i 200°C + 20 minuter för varje halvkilo. Har man fyllning med skall vikten av den räknas med, och även så gäller det att inte packa den för tätt. Men annars är det inget att vara rädd för (så länge själva fågeln man får tag på är någorlunda saftig) och framförallt ser det väldigt imponerande ut. Vilket man nog inte kan säga om fyllningen själv.

Roast Chicken


To recap in English:

Cyberkocken is the Swedish equivalent to the Paper Chef event - you get a certain number of ingredients and prepare a meal or dish using all of them. This time the ingredients were lemon, chorizo, artichoke and bread. I'd been dreaming of a chorizo-specked creamy artichoke gratin, but couldn't find fresh artichoke so I guess I'll have to keep on dreaming for a while. In the meantime it had been a while since I last roasted a chicken, so instead of actually coming up with a recipe, I threw all the ingredients together for a stuffing.

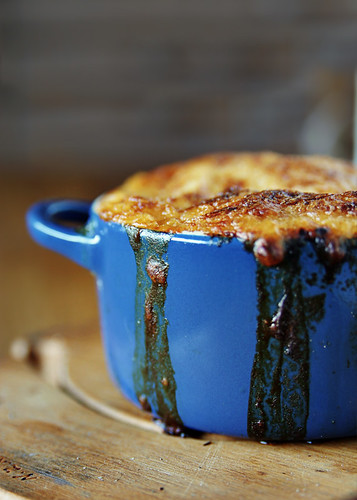
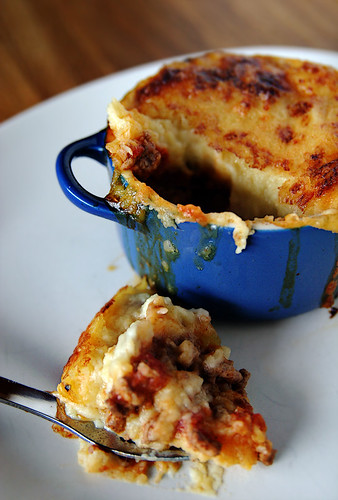
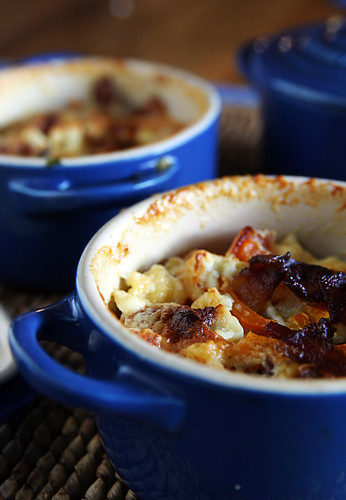
In fact, I got a little bit carried away and wound up with way more stuffing than I actually needed. Luckily salmonella fears have taught me that stuffing should can be prepared separately, so the leftovers went into these lovely new cocottes.

The great thing about a roasted chicken is that it looks pretty. And more complicated than it is - the first time I roasted one whole I couldn't imagine winding up with anything other than a complete mess on my hands, but no, it's really easy and fairly foolproof. My formula for roasting times comes from Nigella Lawson's How to Eat - 30 minutes at 200°C/400°F + 20 minutes for every pound (500 g).

Rostad höna med chorizo & kronärtsskocka
1.5 liter brödtärningar
225 g riktigt stark chorizo, också den tärnad
1 msk olja
1 lök, skivad
4 vitlöksklyftor, hackade
2 burkar kronärtsskockshjärtan (det skulle säkert gå fint med färsk också), sköljda ock skurna i bitar
färska örter (själv hade jag bara persilja, men det gick helt bra)
2 dl hönsbuljong
1 msk torr sherry
1 citron
1 (eller 2) hel kyckling
salt & peppar

Toasta brödtärningarna lätt i en 150-gradig ugn (skaka om då och då) - ca 20 minuter.

Fräs löken och vitlöken i oljan (med chorizon om den är rå och inte rökt som min) tills de är mjuka, blanda i kronärtsskockan och örterna (och chorizon). Rör om tills allt är varmt. Just före du skall stoppa i fyllningen blandar du i brödet och en slurk hönsbuljong med sherryn iblandad. Peppra enligt smak.

Värm ugnen till 200°C. Skölj och torka fågeln och nyp bort ev. fjäderrester (uck). Salta och peppra både ytan och innanmätet, fyll på med så mycket av fyllningen som ryms. Peta in citronskivor under skinnet på bröstet (eller släng i dem tillsammans med fyllningen - under skinnet ger mer smak tycker jag men det blir såklart mindre vackert). Gnid in lite olivolja i skinnet och bind eventuellt upp vingarna. Stek på galler (eh, med en ugnsform under, såklart) i 30 minuter + 20 min för varje 500 g, pensla ytan med lite hönsbuljong några gånger under stekningen.

Resten av fyllningen häller du i en smord ugnsform (eller flera - det kanske bara är jag som har fnatt på portionsformar men i det här fallet var det också praktiskt för en större form hade nog inte rymts i ugnen) och steker täckt med lock eller folie i ungefär en kvart och sedan otäckt (hrm) en kvart eller så till, tills ytan blir vackert krispig. Att sätta in formen ca 20 minuter före hönan skall vara färdig borde fungera bra, för den kan gärna sitta kvar i ugnen en stund medan hönan vilar på skärbrädet.

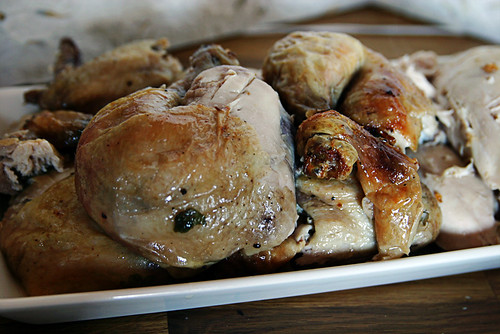
Hur man vackert skär upp en höna får ni lista ut själva, för det kan inte jag.

Roast chicken


Chorizo and Artichoke-Stuffed Roast Chicken
1.5 l (6 cups) breadcubes
225 g (½ lb) chorizo, cubed
1 tbsp olive oil
2 medium onions, chopped
4 cloves garlic, minced
2 cans artichoke hearts, drained, rinsed and cubed
fresh herbs (I used parsley)
200 ml chicken stock
1 tbsp dry sherry
1 lemon
1 (or in this case, 2) chicken
salt & pepper

Toast the breadcubes in a 150°C oven for about 20 minutes, stirring a few times during baking. Soften the onions and garlic in the olive oil (together with the chorizo if it's raw), then add herbs and artichoke hearts (and chorizo) and stir until it's heated through. Just before stuffing the bird(s), mix in the bread cubes and a splosh of sherried chicken stock. Add pepper to taste.

Clean and dry the birds and salt and pepper inside and out. Add some stuffing to the inner cavities and lemon slices either together with the stuffing or pushed in under the skin on the breasts of the chicken.

Roast at 200°C for 30 minutes + 20 minutes for every pound (500 g), basting with the remaining chicken stock a few times during roasting.

Pour the rest of the stuffing into one or several greased oven-proof bowls and bake, covered, for about 15 minutes, and then uncovered another 15 minutes or until crisp on the surface.

Recipe after the jump!

Sunday, April 1, 2007

Bagels

I came to bagels comparatively late in life, in my late teens, the first time I visited the US. And then I went to the US several times in the span of a few years, but now it's been more than five years since the last trip and all that time I've been deprived of bagels. Because they aren't widely available here and I didn't crave them enough to go a-hunting.

Bagels

Having been burned by my one and only bread book's naan and tortilla recipes, I sort of assumed the bagels would be similarly disappointing - that there are certain kinds of region-specific recipes that you just can't reproduce, even with a native's grandmother's super secret recipe.

Bagels

And maybe it's just that my memory isn't quite what it was, but these are some fine bagels right here. They look right, except for the part where I can't bother to stretch the rings out far enough to make a proper hole in the finished product. (The hole is my least favorite part of the bagel anyway. It makes filling them a lot fussier than it need be.) I think the egg wash makes them too dark, but that's the only way the seeds and stuff will stay on when you eat it. But mostly, they just taste exactly right, chewy and slightly-sweet-but-not-really.

Bagels
from Jorden runt på 80 degar by Annica Triberg*

800-900 ml (3.3-3.8 cups) all-purpose flour
2 tsp salt
15 g (½ oz) fresh yeast
250 ml (1 cup) water, lukewarm
2 + 1 tbsp light syrup
2 tbsp melted butter or vegetable oil
1 egg + 1 white
sesame or poppyseeds for decoration


Mix 800 ml of the flour and the salt in a large bowl.

Dissolve the yeast in the barely warm water, then mix in oil, the whole egg and 2 tbsp of the syrup. Pour the wet ingredients into the dry and work together. Once it's all smoothly mixed, let the dough rest for five minutes, then knead (adding more flour as needed) for ten minutes.

Rinse and oil the bowl from earlier, put the dough in and turn it around once so all surfaces are greased, then cover with clingfilm and let rise for an hour and a half.

Tip out onto a work surface and knead a few times, then divide dough into 12 pieces (will make fairly small bagels). Form each piece into a round bun, then press your finger through the middle and stretch out a largeish hole in the middle (will shrink like crazy as the bagels rise, so if you want a proper hole, make it HUGE at this stage). Let rise on a slightly floured surface, covered with a kitchen towel, for 15 minutes.

Meanwhile, heat the oven to 200°C/400°F and bring a large pan of water, with the remaining tbsp of syrup and a dash of salt mixed in, to the boil.

Boil the bagels, a few at a time for about a minute, turning them halfway through, then drain and brush with the egg white and sprinkle with topping of choice. Bake for 20-25 minutes, until golden brown. Cool on racks.

These are out of this world fresh from the oven, but I haven't quite figured out how to get them that way for breakfast. The best version so far is putting the boiled but un-garnished bagels in the fridge overnight (certainly this is better than refrigerating the pre-boiled ones, because those have tended to rise too much and then deflate), but the crust dries up and doesn't become as typically chewy and bagel-ish that way. Luckily, they're still very good the morning after, especially if you toast them first.

*highly recommended, despite the naan and tortilla mishaps. Of what I've made, the Estonian rye bread (which is just like Finnish rye bread), hamburger buns, and feta-garlic bread are firm favorites.

Recipe after the jump!

Ginger Crème Caramel

One Christmas I failed to list enough presents on my wish list (in retrospect I have no idea how that could have happened - I've always been fairly materialistic) and my dad punished me by buying one of those kitchen blowtorch thingies. (That was also the year my aunt got me a pineapple peeler/slicer/torture device, and those two regularly do battle over Least Used Kitchen Gadget in the cupboard.) I think I've made crème brûlée about four or five times since then, and each time the brûlée part has been a dismal failure. (I'm afraid of fire, OK?)

Ginger Crème Caramel


So this time when it came upon me to do a solid custard type dessert, I decided to leave the blowtorch in the furthermost corner of the cupboard where it belongs and go for crème caramel instead. I also had a piece of the most beautiful ginger I've ever seen wasting away in the fridge, so choosing a flavor was no hassle at all. And it works SO WELL, people! The caramel has an intense, almost peppery tang of ginger, while the custard part is just faintly spicy (and superbly soft and creamy - be careful not to leave them in the oven for too long, the cups need to be fairly wobbly still when you take them out and will solidify while they cool).

Ginger Crème Caramel


This pudding is fairly creamy on purpose, but I'm sure you could skew the cream-to-milk ratio without any problems. The method for infusing the caramel and custard with ginger comes from this recipe at epicurious, but otherwise I stuck to a favorite baked custard recipe of mine.

Ginger Crème Caramel
makes 6 servings
for the caramel:
70 g peeled and sliced ginger
155 g caster sugar
50 ml water

for the custard:
200 ml heavy cream
200 ml light (cooking-safe) cream
100 ml 1.5% milk
75 ml caster sugar
2 whole eggs
2 egg yolks

In a thick-bottomed pan, stir the ginger, sugar and water until sugar dissolves, then cook on a medium heat, without stirring, for six minutes. Fish out the ginger with a fork and set aside (you'll be steeping them in the cream in a moment) and continue cooking the caramel until it turns golden brown. Pour immediately into ramekins, tilting to spread over the bottoms. (Mine solidified to the point that I thought the dish ruined for sure, but miraculously there was actual runny caramel when I overturned them the following day. Don't despair!)

Heat the creams, milk, sugar, and ginger pieces in a large pan until it comes to the boil. Take off the heat and let stand for a few minutes. Mix the eggs and yolks in a bowl. Pour in about a third of the warm cream in a slow stream, stirring gently, then pour the egg custard in with the rest of the cream, still stirring. Strain through a fine sieve to get rid of the ginger pieces and divide into ramekins.

Bake at 150°C in a bain marie for 20-30 minutes, until the edges are just set and the centers are still wobbly. Cool on racks to room temperature, then cover with clingfilm and refrigerate until ready to use.

To serve, run a knife around the edge of each ramekin, then invert a plate over it and, holding everything tightly together, invert crème caramel onto plate. (May be easier said than done.)

Recipe after the jump!